
by Mick Gormley
It’s the time of year that many of us have finally given in to an undeniable yearning and begged Santa for a home espresso machine.
On waking up with a big box, a shiny metal sculpture and a set of indecipherable instructions, however, your initial excitement may have evaporated when you realised you have no idea how to begin.
With this in mind, we have just posted a little video to the Steampunk YouTube channel which will give you some quick tips and, I hope, the confidence to take the plunge and get your home barista career kickstarted. Check it out HERE.
To complement this, I thought it might be worthwhile to expand upon a few of the points made in the film, and include some links to other videos that might help you hone your technique and help you get the best from your machine.

First off, some realistic expectations
I’m going to be honest - getting espresso right is a tricky business!! It’s relatively easy to make outstanding coffees at home with almost any other brew method but making a good espresso (and espresso-based drinks like lattes, flat whites and cappuccinos) requires a great deal more effort, whether you’re a home-brewing novice or an experienced member of Team Steam.
Without wishing to dampen your enthusiasm, it’s important to bear in mind that even though espresso machines are not cheap, your financial investment doesn’t equate to quick and easy results (despite what some glossy adverts might lead you to believe)! If your coffees are not up to scratch it’s probably not the machine, it’s not you, and it’s DEFINITELY not your expertly roasted Steampunk coffee beans, it’s just… hard!! This is a commitment, a labour of luuuurve.
However! Understanding how the flavours in your coffee beans are extracted by the espresso machine, how important it is to have the beans ground properly, and having a basic recipe for you to follow will put you on the right path.
That’s what we aim to give you in this post - so get to the bottom of this and get cracking! Theory will get you so far, but there is definitely no substitute for getting your hands dirty (or covered in coffee grounds) and the more comfortable you are with your machine, the quicker you’re going to start having fun.
Understanding the basics
Extraction
One of the first things l learned when I started at Steampunk was that different compounds in ground coffee beans are extracted at different stages during the process of running an espresso shot, with fats coming first, followed by acids, sugars and eventually plant fibres.
To make a good espresso you are basically chasing the moment at which the flavours created by acids are balanced out by the sugars. There is a very fleeting window in which this happens, and tiny adjustments (to the size of your grind, for instance) can make disconcertingly large differences to the flavour. Stopping the shot too early will give you an unpleasantly sour, under-extracted drink, too late and it will be bitter and ashy, or over-extracted. We love this VIDEO which explains the basics of extraction in an easy to understand manner.
Every day at Steampunk, before the doors open and the first customer is served, the barista will go through the process of ‘dialling in’ the coffee beans on the espresso machine, often experimenting with dozens of shots, discarding them along the way to find that magic moment of deliciousness.
Sadly, not many of us can afford to sacrifice so much (or indeed any) coffee on our home machines, so making espresso at home is always likely to be a compromise, an approximation. That's why it's so important to pay careful attention to details such as the way your coffee is ground, to maximise your chances of getting it right.
Grind
The grind for espresso is fine, but it also has to be consistent in size. Cheap electric coffee grinders with blades smash the beans into differently sized chunks, which extract at different rates, and generally give you a drink that is both under- and over-extracted at the same time.
You need a grinder with ‘burrs’ rather than blades to make good coffees, and to add insult to injury not all good burr grinders can achieve the fineness required for espresso.
Having just acquired an espresso machine you may be unwilling, understandably, to shell out even more for a grinder (though it will come, believe me), so my recommendation would be that you have your coffee ground by your roaster or coffee shop. While it's true that your coffee will taste better if it is ground just before you brew it, it's more important that it has been ground on a decent burr grinder.
Do please bear in mind, however, that every machine is different, just as every one of our coffees is different so there will never be an absolute, definitive grind size that works for everyone. If you are having your beans ground at Steampunk, ask the barista to mark the precise grind setting they use on the bottom of your tin. If you are experiencing problems in finding a workable grind size for your machine, this will allow us to know where to make adjustments.
If you do decide to take your coffee expenditure to the next level, the good news is that the makers of the Baratza Encore, an excellent and relatively affordable entry-level grinder, have launched a new version (the ESP) which has been designed to cope with espresso. At time of writing we have a small stock of ESPs at Steampunk, which retail at £159. Find out more HERE.
At this point I would also say that I haven't used a bean-to-cup home espresso machine, which has an integrated grinder, so I'm not really qualified to comment on the quality of grind that they can achieve (and obviously this will differ among the many models available). If your fancy new machine can grind too, I would suggest paying close attention to the settings recommended by the manufacturer, and be prepared to experiment. If you are not getting good results, it might be a good idea to make a comparison using beans ground at a coffee shop.
Recipe
To help home baristas understand what to aim for, we recommend using a simple recipe for every shot. This is based on a widely-used starting ratio of 2:1, and we would suggest 18g of ground coffee for the ‘dose’, which should give you a shot of liquid espresso that weighs around 36g. If the grind is good, the shot should take somewhere between 25 and 35 seconds to run.
dose
This blueprint for success sadly requires one little additional investment and a willingness to be a bit nerdy. You will need a set of scales which are accurate to 0.1g (and for convenience have an integrated timer), and you will have to use them to measure every shot you pull. These scales can be very cheaply bought, and will have an enormous impact on your ability to control your espresso. Coffee brewing scales made by Rhino are available at Steampunk (HERE) for £39.99.
Please note: 18g is a double shot, and your machine is likely to come with double- and single-shot baskets. A single shot of 9g should take around 25 seconds to run.
Another key to success lies in the careful preparation of the grounds you place in the portafilter before you pull your shot. You want to get all of your 18g dose cleanly into the basket (inevitably there are add-on tools to help you do this but it can be done without).
distribution
Next, you want to distribute the grounds as evenly as possible, to give you the best chance of extracting the coffee evenly. To better understand why distribution is so important, check out this excellent VIDEO. The simplest way to distribute your coffee grounds is to hold the portafilter in your leading hand and then tap gently with the pad of your other hand at the ‘twelve o’clock’ position on the basket. You should end up with a level bed of grounds which you can then compress or ‘tamp’ with the tamping tool provided. I do recommend watching a VIDEO of this, as the action is quite specific and it can be uncomfortable for your wrist if you come in at the wrong angle. You’re looking for a straightforward vertical pressure (with no ‘barista’ twist at the end) which compresses the grounds, creates a flat, even bed, and slows the flow of water through the coffee to get the best rate of extraction.
Using these techniques should enable you to start making espresso shots with a little bit more confidence, and be assured you’ve now done the most difficult bit!
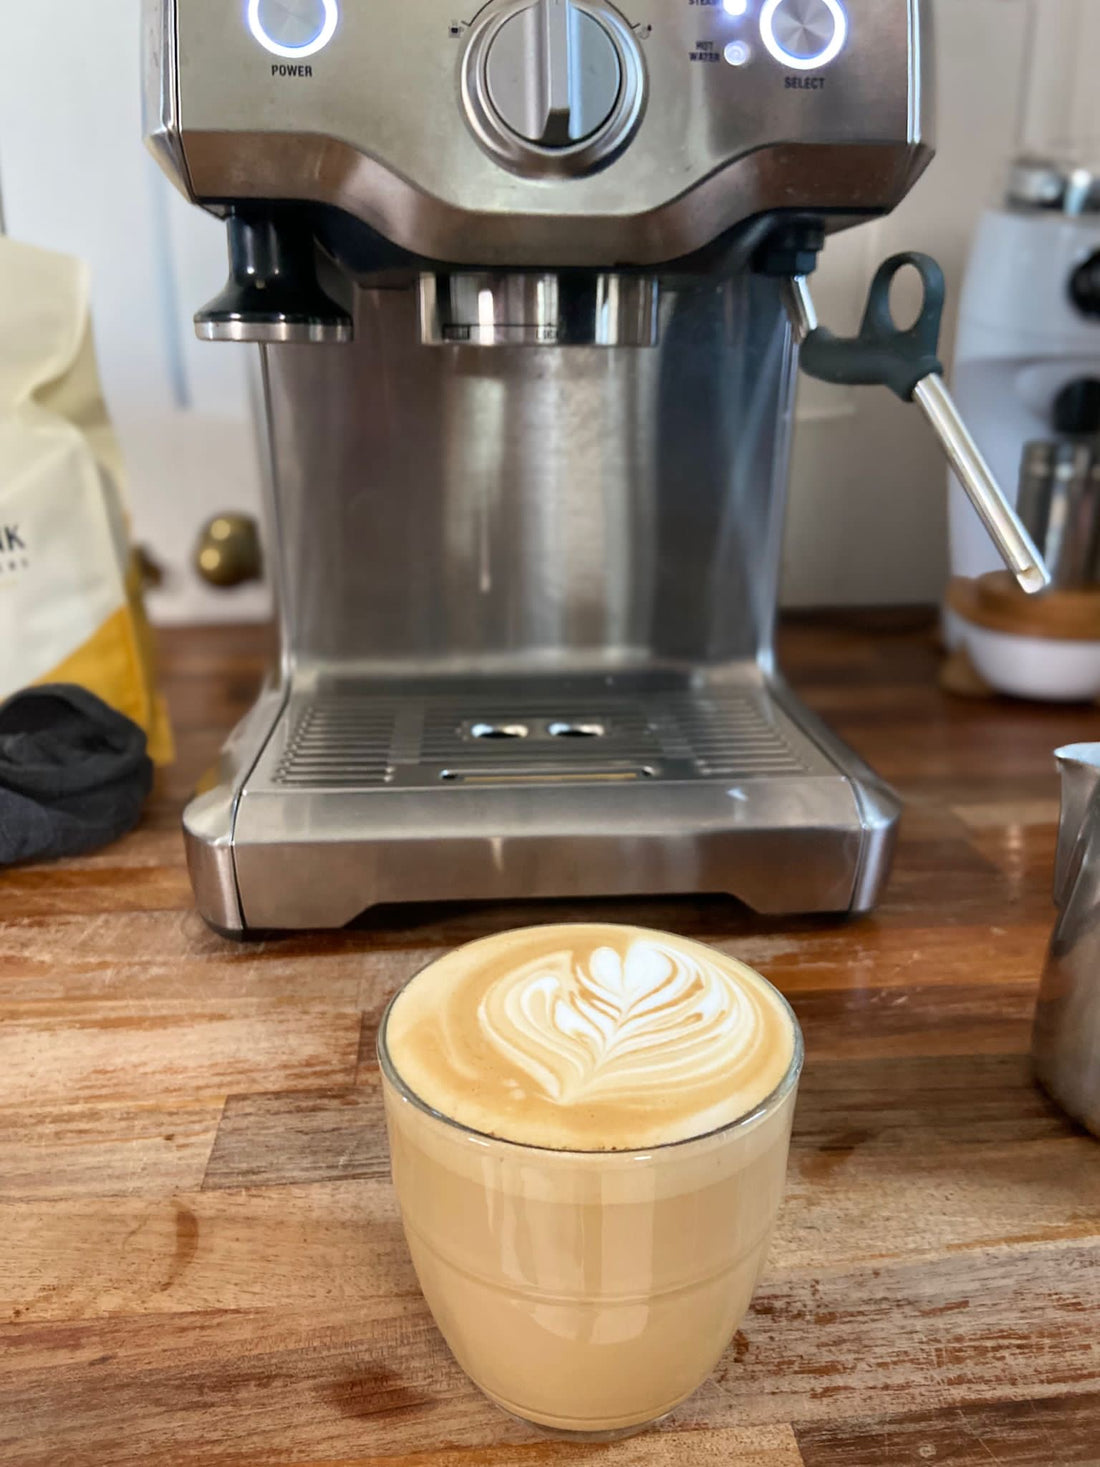
Steaming milk
One of the greatest pleasures of using a home espresso machine is making the same silky-smooth steamed milk that you get in a coffee shop like Steampunk. The amazing news is that it's actually easier at home, because the lower pressure in the steam wand (in the machines I've used at least) gives you more time to control the process of injecting a little air into the milk, creating a vortex to break large bubbles into smooth foam, and then heating the milk a good drinking temperature. You'll never again look on with such admiration as a barista creates pretty patterns in your milk because YOU CAN DO IT YOURSELF!!! (Only a few thousand hours of YouTube videos like these excellent ones by Emilee Bryant, and a few thousand gallons of milk to practise and you'll nail it!)
Not only will you be buoyed by your success and wow your friends, you'll find that drinking delicious milk with your espresso makes the difficulty of finding the perfect shot a little less of an issue. A beautiful flat white or latte creates pleasure for the taste buds and for the eye that can offset the frustrations and limitations of home espresso brewing.
Do watch the videos though, and be aware that jugs for steaming milk need to be a particular shape (and size) in order to create microfoam milk. At Steampunk we use differently-sized jugs for one, two or more drinks, and you will have to do the same. Your new machine will arrive with a milk jug, but it will only be perfect for one latte for example, or more likely two. A standard milk steaming jug will be filled to just below the spout to allow you to create the all-important vortex, but if it's a two-cup jug and you only want enough for one drink, filling it halfway is not going to work. This is another example of the add-on purchases that come with going down the home espresso route, but once again these jugs are fairly inexpensive. You can try Coffee Hit or Nisbets for relatively inexpensive jugs.
In conclusion
It's often said that making espresso at home is a hobby rather than a quick way of supplying your caffeine fix. I hope that anyone who has a home machine will get great pleasure from using it, but you are definitely in it for the long haul. I feel strongly that these machines are often sold without buyers being made aware of the complexities involved in operating them, so I hope that some of the information in this post will be useful for new owners and anyone who has been struggling to master home espresso.
If you are having issues with your machine, do email us (via the contact form at the bottom of the homepage of our website) and we’ll do our best to advise you. I’m very interested to understand more about the various home espresso machines out there, so I’m thinking of trialling a potential home visit service to get our customers up and running. If you’re in North Berwick or nearby and would like this kind of input, please get in touch.
Good luck everyone, and always remember that there is a wealth of excellent material on YouTube. The gold standard is anything by British coffee expert James Hoffman, whose videos are detailed, informative and very straightforward.
Watch Mick's home espresso video on our YouTube HERE. A big thank you to Castaway Creatives for filming and editing the video.
